 |
|
|
|
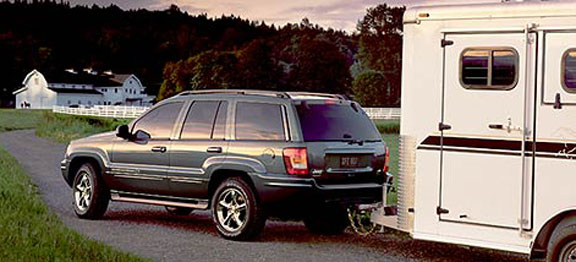
| Trailer hitch packages, in general, are divided into four classes. Class I and Class II are usually designed to be weight-carrying with use of a ball mount. The Grand Cherokee WJ uses Class III and Class IV, which can carry heavier loads with the use of a weight-distributing hitch assembly that distributes the weight to all trailer and vehicle axles. A ball mount can also be used with Class III and Class IV Hitch Receivers for lesser loads. |
Never overload your vehicle beyond these design capacities. DaimlerChrysler cannot be responsible for brake performance if the Jeep vehicle and hydraulic brake systems are in any way connected. Do not interconnect the hydraulic brake system of your vehicle with that of the trailer. This could cause inadequate braking and possible personal injury.
When pulling a heavy load or driving a fully loaded vehicle use a premium unleaded fuel to
help prevent spark knock. If spark knock persists, lighten the load. Otherwise, engine piston damage may result.
Be sure a trailer is loaded heavier in front, about 4% of Gross Trailer Weight (GTW). Loads balanced over the wheels or heavier in the rear cause the trailer to sway severely side to side which will cause loss of control of the vehicle and trailer. Failure to load trailers heavier in front is the cause of many trailer related accidents.
Gross Trailer Weight (GTW) means the weight of the trailer plus the weight of all cargo, consumables and equipment loaded on the trailer when in actual underway towing condition. The best way to measure GTW is to put your fully loaded trailer on a vehicle scale. The entire weight of the trailer must be supported by the scale.
A separate brake system for all trailers weighing over 1,000 pounds gross is recommended. (State laws should be checked for trailer brake requirements.)
Do not connect a trailer lighting system directly to the lighting system of your vehicle. Use an approved trailer wiring harness. Failure to do so could damage the vehicle electrical system and/or result in personal injury.
When hauling cargo or towing a trailer, do not overload your vehicle or trailer. Overloading
can cause a loss of control, poor performance or damage to brakes, axle, engine, transmission,steering, suspension, body structure or tires.
Make certain that the load is secured in the trailer and will not shift during travel. It is recommended that any hitches installed on your vehicle be factory installed, or installed by
a dealer using factory approved parts. Factory approved parts are specifically engineered
with your vehicle�s performance in mind, including the possibility that it will be involved in an accident. Other hitches may not have been so engineered. Vehicle performance, including vehicle damage in an accident situation, may therefore be different.
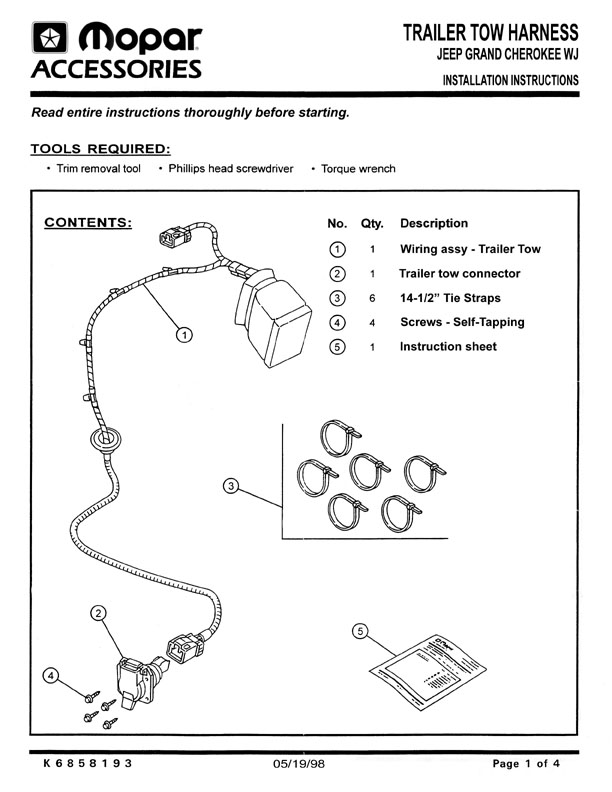
If trailer towing is required and your vehicle is not equipped with a trailer tow package, the Mopar accessory towing harnesses are the only approved method to provide for trailer
lights. These harnesses are designed to provide current to the trailer lights but bypass the
module designed to monitor tail lights. Refer to the package instructions for details.
See your Owner�s Manual for additional important information regarding proper operation of this vehicle.
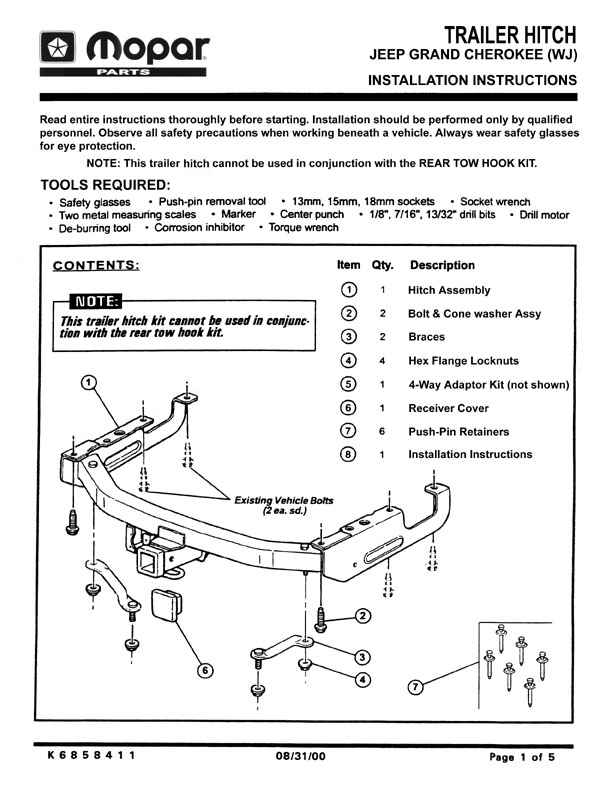
The proper installation of Hitch Packages and other towing equipment is extremely important. Mopar Hitch Packages are designed and tested to ensure a proper match with DaimlerChrysler Corporation vehicles, and install easily using existing vehicle frame holes. However, failure to completely follow the installation instructions and procedures can cause hitch failure which could result in personal injury and/or vehicle damage. Beware of some aftermarket installers who could mount hitch packages that have a higher towing capacity than the vehicle can manage.
NOTE: Do not connect a trailer lighting system directly to the lighting system of your vehicle. Use an approved trailer wiring harness. Failure to do so could damage the vehicle electrical system and/or result in personal injury.
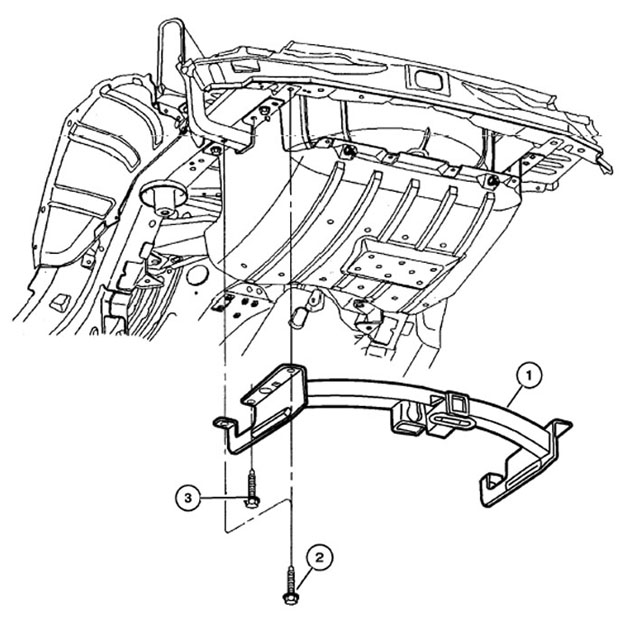
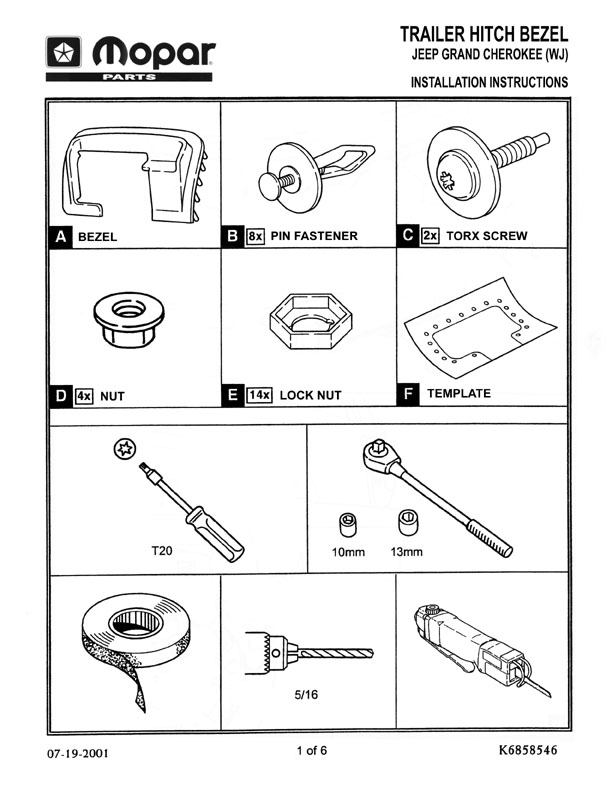
Includes:
1x Hitch assembly
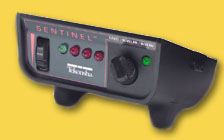
Note: This harness is discontinued from Jeep but is available from Tekonsha.
For more information on trailer brake controllers, see section below.
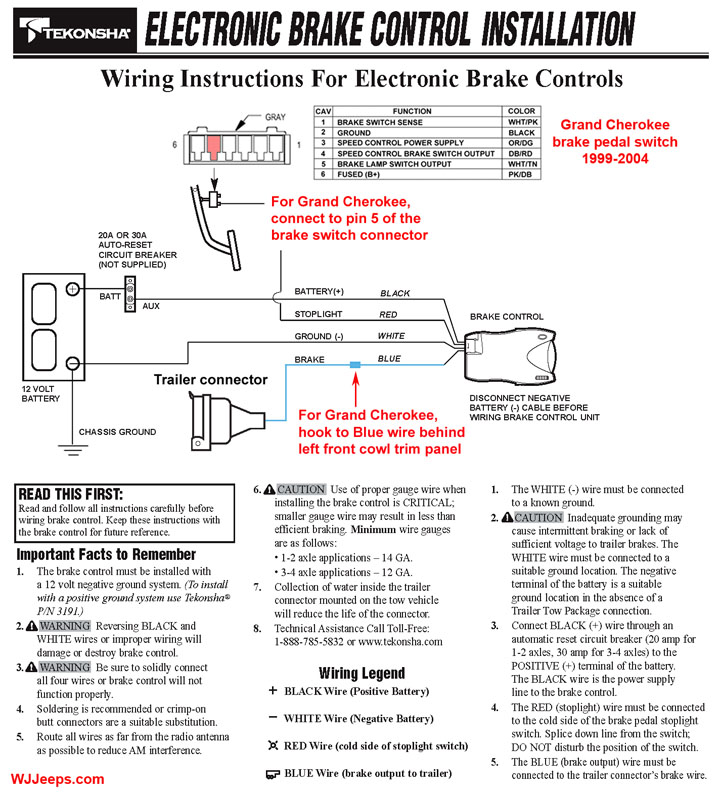
Electronic brake controllers are available from companies such as Tekonsha. For 2001 Grand Cherokees that came with the tow package, a pre-assembled wiring harness is available that plugs directly into the blue connector that is supplied underneath the dash. For all other Grand Cherokee WJ models (1999-2000 and 2002-2004) four wires from the brake controller must be connected to the vehicle wiring:
1. Power (connects to vehicle constant 12V+, with 20A or 30A in-line circuit breaker at power source. The circuit breaker is usually not supplied with brake controllers and needs to be purchased separately).
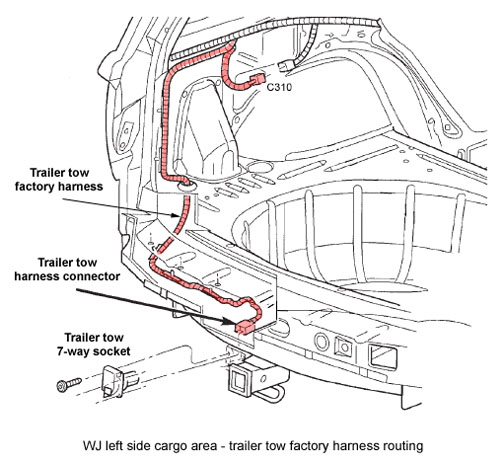
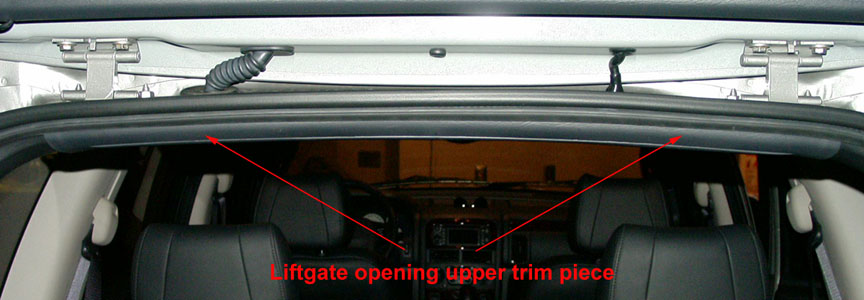
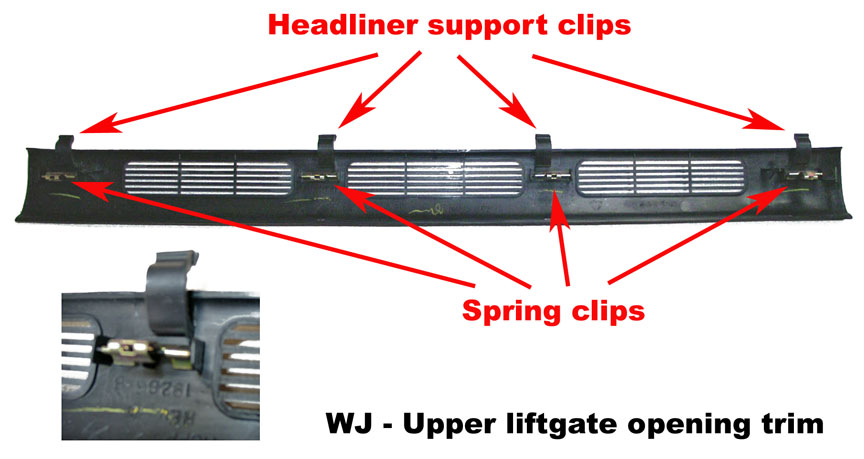
1. Remove the liftgate opening upper trim panel piece. The trim piece is held in place with four spring clips. Grab the edge closet to the front of the vehicle and carefully pull it down a enough to release the spring clips, working from one side to the other. Tilt it down from the front and pull it back to disengage the four headliner support tabs.
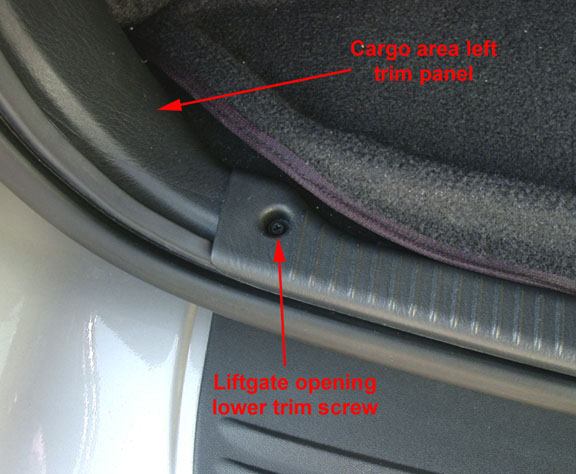
3. Remove the left phillips screw on the lower liftgate opening trim piece. This will allow the cargo area left trim panel to be slid out from under the lower liftgate trim piece.
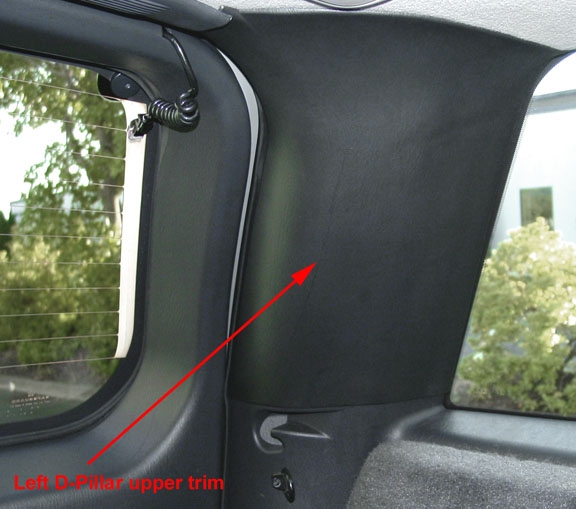
4. Remove the D-pillar upper trim piece by grasping it at the top and pulling outward. It is held in place by two strong spring clips and two alignment pins.
5. Grab the left trim piece starting at the top left corner and pull outward to release the spring clips. It will require a firm pull in a couple locations. The trim can now be pulled back far enough to gain access behind it for the trailer tow wiring harness. If you would like to remove the entire trim piece, fold down the left side rear seat and the trim can be pulled all the way off. There is one other snap clip towards the front of the trim to release, and it can then be pulled out from under the door sill trim.
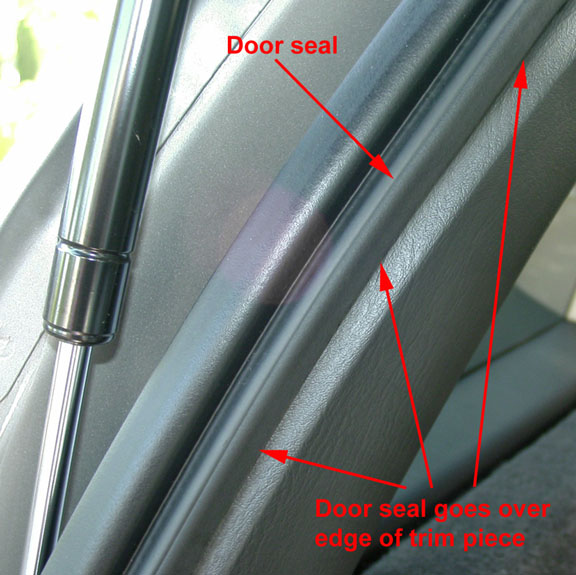
1. Start at the narrow end towards the front of the vehicle and seat the trim edge under the door sill trim. Work the trim into place going towards the back. Make sure along the way that all of the plastic guide pins and metal spring clips are aligned properly to their slots before pressing it back into position.
2. Reinstall the small upper D-pillar trim piece. Be very careful that the two plastic tabs are aligned, and also that the spring clips are aligned before pressing them into place. Once aligned a quick pound or two with your palm opposite at clip area will secure it to the vehicle.
3. Reinstall the liftgate opening upper trim piece. Fit the plastic clips into place around the headliner edge and align the four spring clips as you work from one side to the other, pressing them into position.
4. Reinstall the liftgate open lower trim phillips screw, making sure the trim is aligned properly.
5. Confirm that the liftgate opening rubber seal is positioned over the quarter panel trim piece along the entire edge, and also along the top edge of the liftgate opening where the long trim piece was reinstalled.
WJ Towing Data
Engine
Transmission
Maximum Loaded Trailer Weight
4.0L Power Tech I-6
4-speed automatic
5,000 lb
4.7L Power Tech V8
5-speed automatic
6,500 lb
High-Output 4.7L Power Tech V8
5-speed automatic
6,500 lb
Maximum gross combined weight rating
Class
2WD
4WD
III
9550 lb
7550
IV
11,000 lb
11,000 lb
Tongue Load Limit
III, IV
750 lb
Maximum trailer length
III
25 feet
IV
30 feet
Trailer frontal area limitation of 64 square feet; trailer sway control and low-profile mirrors are recommended. This chart is meant to serve as a quick and easy reference guide on how to properly equip your Jeep Grand Cherokee for towing. For specific details, however, discuss your plans with your Jeep dealer, who will help you select the right equipment to meet your specifications.
Hitch receiver parts and accessories
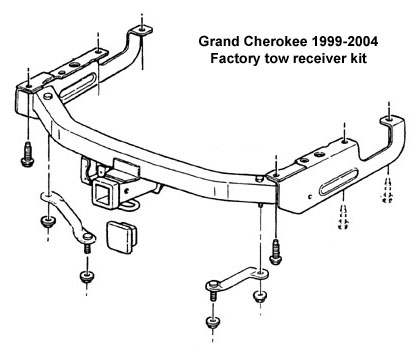
Item Part # MSRP Factory trailer tow receiver kit Trailer tow receiver kit (black)
2x Braces
2x Bolt and cone washer assemblies
1x 4-way adaptor kit
1x Receiver cover
6x Push-pin retainers
4x Hex flange locknuts
1x Instruction sheet
(w/weight distributing equipment; otherwise 2,000-lb tow rating, 350-lb tongue weight rating.)
82206837
$185.00
Tow receiver miscellaneous parts M12x1.75x45 bolts (2) (included with receiver kit)
6101102
$1.20
Receiver plug, rubber (included with receiver kit, fits 2" Hitch Receiver, w/Mopar logo)
82203602
$10.00
Receiver plug, rubber (included with receiver kit, fits 2" Hitch Receiver, w/Jeep logo)
82203600
$10.00
Mopar Hitch Balls are made of heavy-duty forged steel with incorporated wrench flats that aid in installation and removal and are designed and tested to match the vehicles towing requirements. Hitch balls are sized in three dimensions: ball diameter, shank diameter and shank length. These dimensions are used to determine the hitch ball�s weight
rating. When selecting a hitch ball, match the ball�s weight rating and ball
diameter to the trailer coupler�s weight rating and size. The coupler is the part of the trailer that attaches to the hitch ball. The socket on the coupler should be smooth, clean and slightly lubricated. Couplers are weight rated to the trailer load (GTW) and come in various sizes. 1-7/8" diameter ball, 3/4" diameter x 1 3/4" long shank, w/wrench flats
82401104
$18.00
1-7/8" diameter ball, 1" diameter x 2 1/8" long shank, w/wrench flats
82401102
$18.00
1-7/8" diameter ball, 3/4" diameter x 2-5/16" long shank, with wrench flats
82401197
$18.00
2" diameter ball, 3/4" diameter x 1 3/4" long shank, w/wrench flats 82401105
$18.00
2" diameter ball, 1" diameter x 2 1/8" long shank, w/wrench flats
82401103
$18.00
2" diameter ball, 1" diameter x 2 7/8" long shank, w/wrench flats
82401106
$18.00
2-5/16" diameter ball, 1" diameter x 2-1/8" long shank, with wrench flats
82401218
$18.00
Designed and tested to match your vehicles towing capacity, Mopar's Ball Mount Kits are made of heavy-duty cold-rolled steel. E-coat primer and powder-coat paint provide a durable finish.
3-1/2" rise, 2-3/4" drop, use only with 3/4" shank diameter hitch ball, for 2" opening (for weight-carry applications up to 2000 lbs gross trailer weight with approved Mopar trailer ball)
82200248
$33.00
5 1/4" drop, use only w/1" shank diameter hitch ball, for 2" opening. Do not use in rise position
82207411
$33.00
1-3/4" rise, 1" drop, use with 1" shank diameter hitch ball, for 2" opening
82201148
$33.00
3" rise, 2-1/4" drop, use with 1" shank diameter hitch ball, for 2" opening
82201149
$33.00
(All wiring is custom fit to DaimlerChrysler Corporation wiring specifications. Mopar Wire connectors minimize the need for wire splicing and feature a protective wrapping that guards against weather and abrasion.)
P/N 56019823
P/N 56038366AB
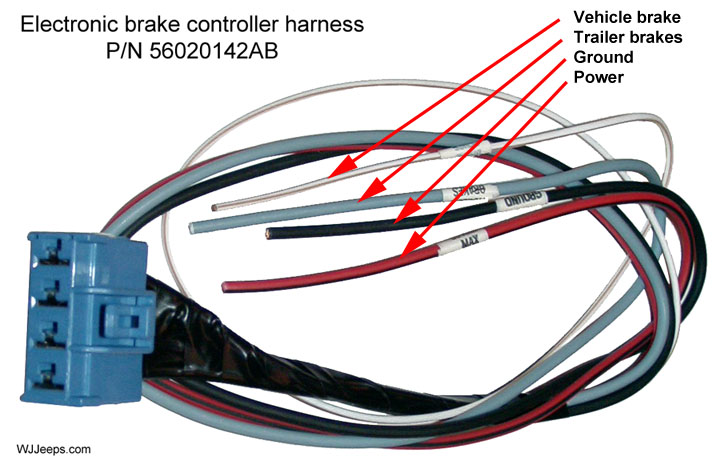
P/N 56020142AB
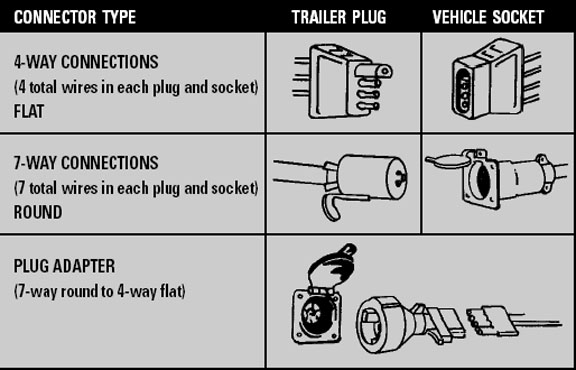
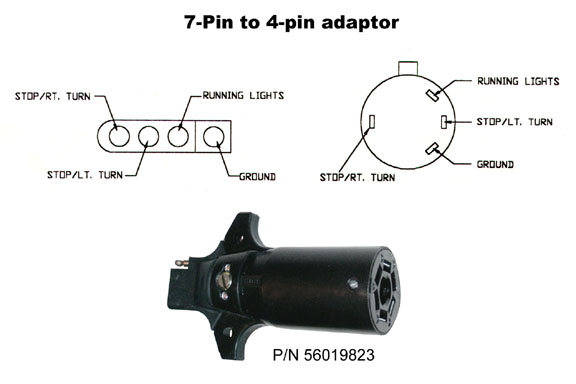
7-pin to 4-pin adaptor
(photo)56019823
$15.00
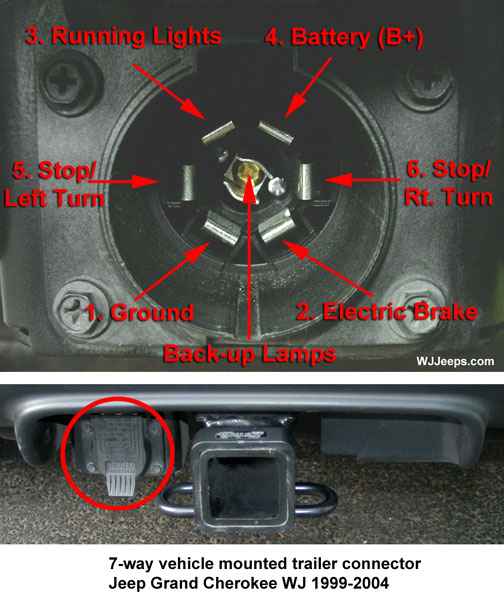
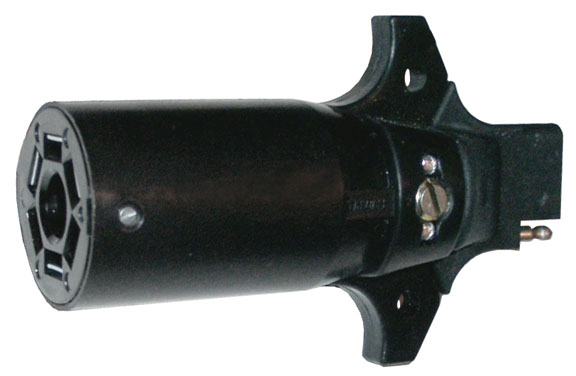
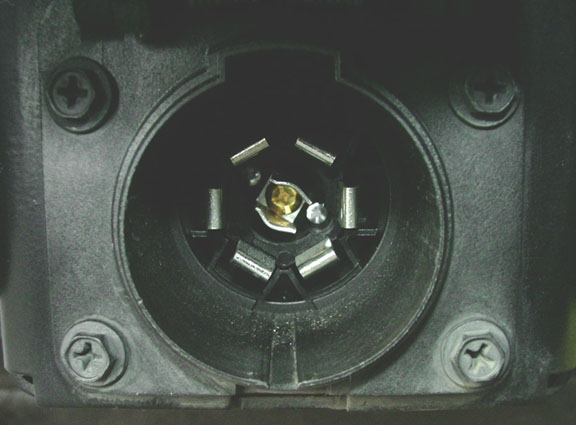
Replacement 7-way connector
7-way vehicle mounted connector (photo)56038366AB
$13.95
Electronic brake controller harness (2001 models only)
For ease of installation of an electronic trailer brake controller. In 2001 Grand Cherokees with the factory tow package, a mating blue connector was provided under the instrument panel to the left of the steering column, attached to the top of the large connector bracket. (photo)
56020142AB
N/A
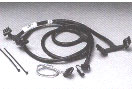
Wiring Harness Package
With 7-way round trailer connector, plugs into vehicle 10-way connector, no splicing required. Vehicle must have factory tow package.
Note - wiring harness only is P/N 56042239AE
Photo
82206958
$48.00
7-pin to 6-pin adaptor
To connect horse trailer wiring to vehicle82401217
$14.00
Replacement Wiring Kit, Vehicle Side
5-way flat connector with 5 unterminated 8" wires, mates w/ P/N 82400553 Mopar Trailer Tow 5-way wire harness82400709
$19.75
Replacement Wiring Kit, Trailer Side
5-way flat connector with 5 unterminated 8" wires, mates w/Mopar 5-way Trailer Tow wire harness82400553
$15.00
Replacement Wiring Kit, Trailer Side
7-way round connector with 7 unterminated 8" wires, mates w/Mopar 7-way Trailer Tow connector82400554
$23.00
Repair Kit, Vehicle and Trailer Side
4-way flat trailer tow connector82202089
$7.00
Trailer Tow Bracket Kit
To mount 4-way flat trailer tow connector82204602
$5.15
Trailer Tow Bracket Kit
To mount 7-way round trailer tow
connector82204645
$8.00
Rear Fascia Bezel required for receiver hitch installation. Molded to match vehicle color, this bezel provides the look of an OE installation. Installation of the bezel requires an area of the bumper to be cut out. A paper template was originally included with the bezel but no longer is. Template lines are lightly molded into the back of the vehicle bumper. These may be very hard to see, dusting with a fine chalk or powder will make the template stand out a little better. 
Dark Blue Metallic (YBM) - matches 1999-2001 Laredo cladding 82206826 $65.00 Dark Garnet Red (YR8) - matches 1999-2001 Laredo cladding 82206827 $65.00 Medium Gray (HS5) - matches 1999 Laredo cladding 82204629 $65.00 Dark Gray (XS9) - matches 2000-2002 Laredo cladding 82205791 $65.00 Medium Driftwood/Dark Brownstone (VF7) - matches 1999-2002 Laredo cladding 82204630 $65.00 Taupe (WLP) - matches Laredo cladding (2002-2004?) 82207939 $65.00 Taupe (WLP) - 2004 Laredo Special Edition 5FY10WLPAA
(formerly 5FY101LPAA)$31.75 Black (DX8) - 1999-2003 Limited, 2002-2003 Overland 82204628 $65.00 Black (DX9) - 2004 Laredo (except SE), Limited, Overland 5FY07DX9AA $37.50 Jet Black (?) - 2004 Freedom Edition 82208647 $65.00 Note: Parts are not available from this web site, information is listed for reference purposes only. Prices may change without notice and may vary by dealer or seller. Some parts may also be discontinued.
Component
Color
Location
Trailer Tow Brake Lamp Relay
Blk
Left Front Quarter Panel
Trailer Tow Circuit Breaker
Blk
Left Front Quarter Panel
Trailer Tow Left Turn Relay
Blk
Left Front Quarter Panel
Trailer Tow Right Turn Relay
Blk
Left Front Quarter Panel
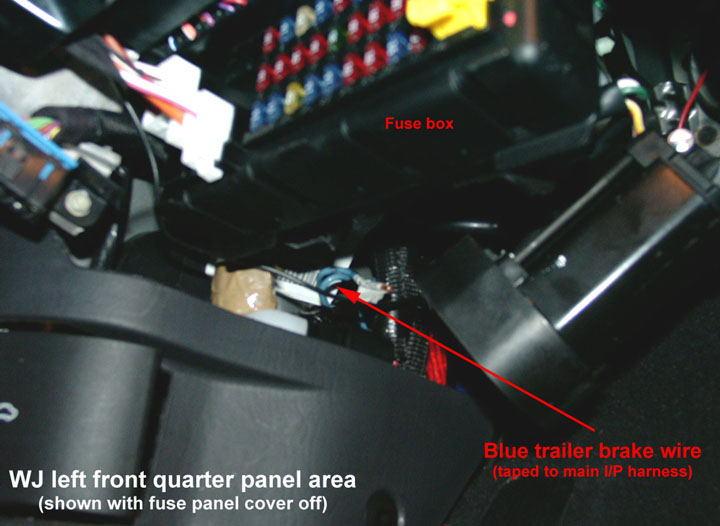
Electric brake controller wire
Blue
Left Front Quarter Panel
Trailer Tow Connector (7-pin)
Blk
In Rear Bumper
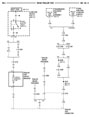
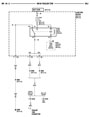
Click on either image to open a PDF file.
2. Ground (connects to vehicle chassis Ground)
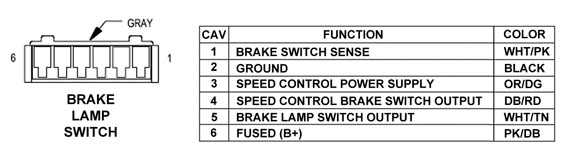
3. Brake lamp switch output (connects to Pin 5 tan/white wire on the vehicle brake lamp switch)
4. Trailer brake controller (blue wire, connects to provided blue wire inside left cowl trim panel. This wire runs from the front cowl to the rear 7-pin trailer connector)
(All models except 2001)
for Mopar trailer hitch, harness and bezel
Hitch (5-page PDF, 1005k)
Harness (4-page PDF, 602k)
Bezel (6-page PDF, 826k)

2. Remove the two metal cargo net hooks that are attached with phillips screws.
Reinstalling the trim panel: